There’s a reason the obstacle-avoiding robot shows up in every Arduino curriculum and still hasn’t gotten old: it’s the smallest build that contains an entire robot. Sense, decide, act — all three, in a loop, on hardware that fits in one hand. Blinking an LED teaches you syntax. A line follower teaches you a reflex. This one teaches you a decision, and that’s a meaningfully bigger jump than it sounds like.
What the build actually is
The canonical version is a two-motor acrylic chassis with a caster wheel, an Arduino Uno on the deck, an L298N motor driver bolted alongside it, a battery pack underneath, and an HC-SR04 ultrasonic sensor mounted to the horn of an SG90 micro servo at the nose. That last detail is the entire trick. A fixed, forward-staring sensor can only tell you something is there. A sensor sitting on a servo can turn its head — and once it can turn its head, your code gets to ask a question it couldn’t ask before: which way is clearer?
The control loop is about four lines of pseudocode. Drive forward. Measure the distance ahead. If that distance drops below your threshold, stop, reverse a few centimeters, then sweep the servo to roughly 150° and take a reading, sweep to 30° and take another. Pivot toward whichever side returned the bigger number, re-center the servo, and resume. Everything past that is refinement.
Why it’s a better second project than another line follower
A line-following robot is a reflex machine. Sensor sees black, motor slows; sensor sees white, motor speeds up. There’s no memory and no comparison — the robot never evaluates two options against each other. An obstacle avoider has to. It has to stop, gather two measurements taken at different times from different angles, hold both in variables, compare them, and commit to one. That’s the first time most people write code that makes a genuine choice rather than just mapping an input to an output, and it’s the conceptual bridge to everything harder that comes after.
The HC-SR04 numbers you need to design around
The sensor fires a burst of 40 kHz sound — well above human hearing — out of one cylinder and listens for the echo on the other. Your sketch measures how long the echo pin stays HIGH, in microseconds, and converts it with distance = duration * 0.034 / 2. The 0.034 is the speed of sound in centimeters per microsecond, and the division by two is because the pulse made a round trip. Useful range is roughly 2 cm to 4 m, with about ±3 mm of accuracy in the middle of that band.
The specification that actually shapes your robot’s behavior, though, is the beam angle: about 15°. You are not measuring a point in front of you. You’re measuring the nearest thing anywhere inside a cone. That’s forgiving for walls and boxes and terrible for chair legs, table legs, and anything shorter than the sensor’s mounting height. Two other failure modes are worth knowing before you blame your code: soft surfaces (a sofa, a curtain, a cat) absorb the 40 kHz burst instead of reflecting it, and any flat surface angled more than about 45° to the sensor bounces the echo off somewhere else entirely. In both cases the sensor doesn’t report “too far” — it reports nothing, and your sketch has to decide what to do with that. If you’re seeing readings that make no sense at all, we’ve got a whole post on why ultrasonic sensors give bad readings.
Set your stopping threshold higher than feels necessary. 25–30 cm is about right for a small chassis, because by the time the sensor reads 15 cm and your code reacts, the robot has already traveled some of that distance.
The power mistake that ruins most first attempts
Almost every “my robot randomly restarts” thread traces back to the same thing: motors drawing current through the Arduino’s onboard regulator. Don’t do it. Run the battery pack into the L298N’s 12V input, let the L298N’s built-in 5V regulator feed the Arduino’s 5V pin, and tie every ground together — motor supply, driver, board, and sensor all sharing one common ground, or your distance readings will be nonsense. When a motor stalls or reverses, it yanks a current spike that collapses the rail; if the Arduino is on that rail alone, it browns out and reboots mid-decision. There’s more on sizing this properly in our guide to powering a robot, and worth knowing up front: the L298N is an older bipolar design that drops roughly 2 V across its output transistors, so 6 V of AA batteries reaches the motors as something closer to 4 V. We covered that tradeoff in the L298N review.
The timing bug nobody warns you about
Two blocking behaviors will bite you. First, pulseIn() halts your entire sketch while it waits for the echo — and if no echo ever comes back (soft object, bad angle), it waits for its default timeout of one full second before giving up. Pass a third argument, something like pulseIn(echoPin, HIGH, 30000), which caps the wait at 30 ms, roughly 5 meters of round trip and already past the sensor’s useful range.
Second, servo.write() returns immediately, but the servo has not finished moving. Read the sensor right after that call and you’ll measure whatever the sensor was pointed at a moment ago, which produces a robot that confidently turns the wrong way. Put a delay(350) between the servo command and the measurement. It feels sloppy and it is exactly right.
What to buy
This post contains affiliate links. If you buy through them, this site earns a commission at no extra cost to you.
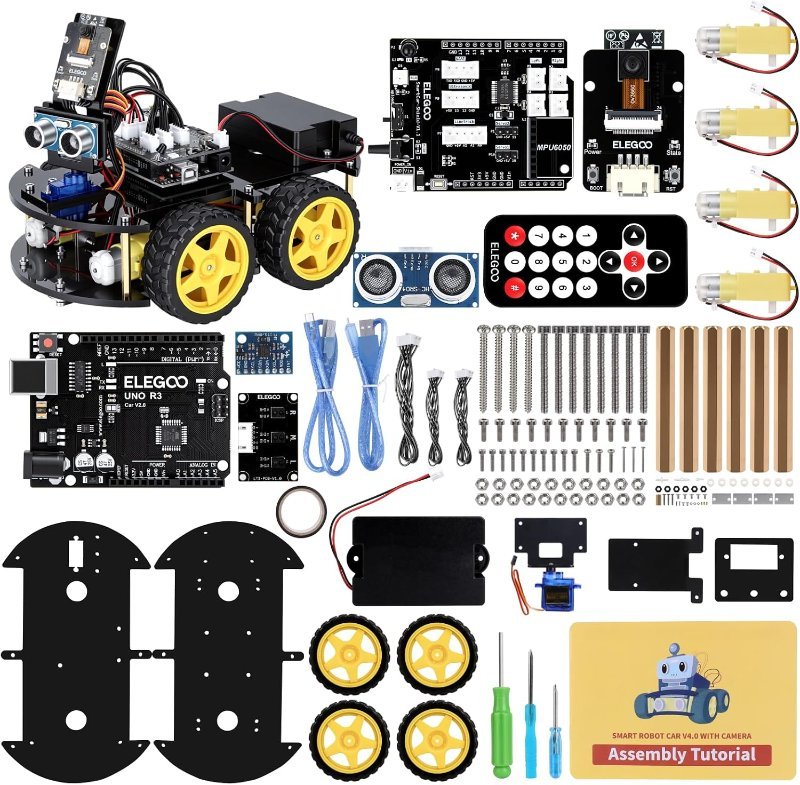
There are two honest routes into this build. If you want to be driving the thing this weekend rather than sourcing parts for two of them, buy a complete kit. ELEGOO’s Smart Robot Car V4 is the one I’d point a beginner at: it ships with an Uno-compatible board, a servo gimbal for the ultrasonic sensor, a line-tracking module, an IR receiver, a 2000 mAh rechargeable pack, and — the part that actually matters — a TB6612 motor driver rather than an L298N, which means noticeably less voltage lost between the battery and the wheels. Obstacle avoidance is one of its built-in modes, so you can confirm the hardware works before you write a line of your own code, then throw out their sketch and write your own. That order of operations saves an enormous amount of debugging.
Everything in one box — chassis, motors, servo gimbal, ultrasonic sensor, TB6612 driver, and a rechargeable pack. Working obstacle avoidance out of the box, then fully reprogrammable.
Check Price on Amazon →The other route is to build it from a bare chassis, which I’d argue teaches more. You bolt the motors on yourself, you figure out the wiring, and when something doesn’t work you actually know every connection in the machine. A basic two-wheel acrylic chassis with TT gear motors, wheels, a caster, and a battery box runs well under the price of a single sensor, and pairs with the Uno, L298N, servo, and HC-SR04 you probably already own. The encoder discs included on this one are a bonus you’ll appreciate later, when you want the robot to reverse a measured distance instead of a guessed one.
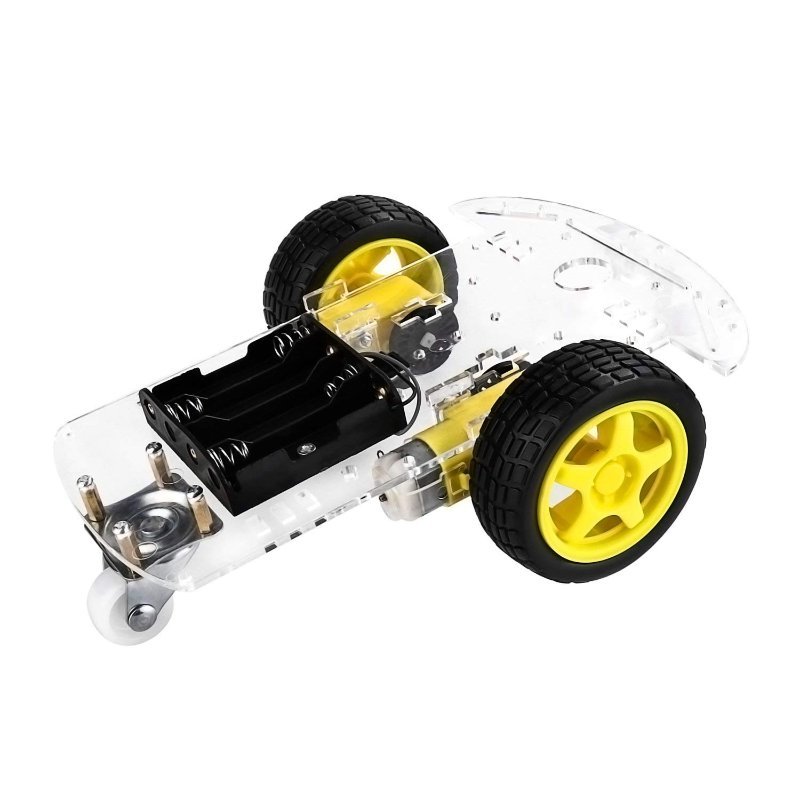
Acrylic deck, two TT gear motors, wheels, caster, encoder discs, and a battery box. Bring your own Uno, L298N, servo, and HC-SR04.
Check Price on Amazon →If you’re weighing chassis options more carefully, we compared several side by side in the best robot chassis kits for beginners.
Set your expectations correctly
This robot will hit things. It will drive straight into a chair leg, get confused by a doorframe at an angle, and occasionally pivot into the wall it just measured. That’s not a sign you built it wrong — it’s the honest limit of one 15° cone of 40 kHz sound making decisions for a machine with no memory of where it’s been. Chasing perfection here is the wrong instinct. Get it reliably avoiding walls and boxes in an open room, then decide whether the next thing you want is a second sensor type, a bumper microswitch as a last resort, or a proper state machine that remembers it already tried turning left. Any of those is a genuinely good next weekend.