Ask ten people what their first real robot was — not a blinking LED, but an actual thing that moves and makes its own decisions — and a surprising number will say the same thing: a line follower. It’s the build that turns a pile of parts into something that behaves. You set the robot on a loop of black tape, let go, and it drives itself around the track, correcting its own steering the whole way. No remote, no joystick. It just follows the line.
The reason it shows up in so many first-robot stories is that it hits a rare sweet spot. It’s genuinely autonomous — the robot senses the world and reacts to it — but the logic behind it is simple enough to sketch on a napkin. Well-documented versions of this exact build live all over the maker web, from Arduino’s own Project Hub to Circuit Digest’s step-by-step guide, and they all share the same skeleton. Here’s why it works, and how to put one together without the parts of the process that scare beginners off.
How a line follower actually sees the line
The whole trick is infrared reflectance. Each sensor on the underside of the robot is a pair: an infrared LED that shines light down at the floor, and a phototransistor sitting right beside it that measures how much of that light bounces back. A white surface reflects almost all of it; black electrical tape absorbs it. So when a sensor passes over the line, the reflected light drops off, and the module flips its output from one state to the other.
Most beginner modules hand you that as a clean digital signal — HIGH when the sensor sees white, LOW when it sees black (or the reverse, depending on the board). That’s the friendly part: your Arduino doesn’t have to interpret a fuzzy analog voltage, it just reads a 1 or a 0 from each sensor. Three sensors — left, center, and right — is plenty to start. The center one should stay parked over the line; if the tape drifts under the left sensor instead, the robot knows it’s veering right and steers back toward center.
Why this particular build is beginner-friendly
The thing that sinks most first robots isn’t the code — it’s the mechanical work. Cutting a chassis, aligning motor mounts so the wheels track straight, and finding a battery holder that actually fits are all fiddly, unglamorous steps that happen before you write a single line of code. A pre-made 2WD chassis kit erases every one of them, which is exactly why it belongs at the center of a beginner build.
This post contains affiliate links. If you buy through them, this site earns a commission at no extra cost to you.
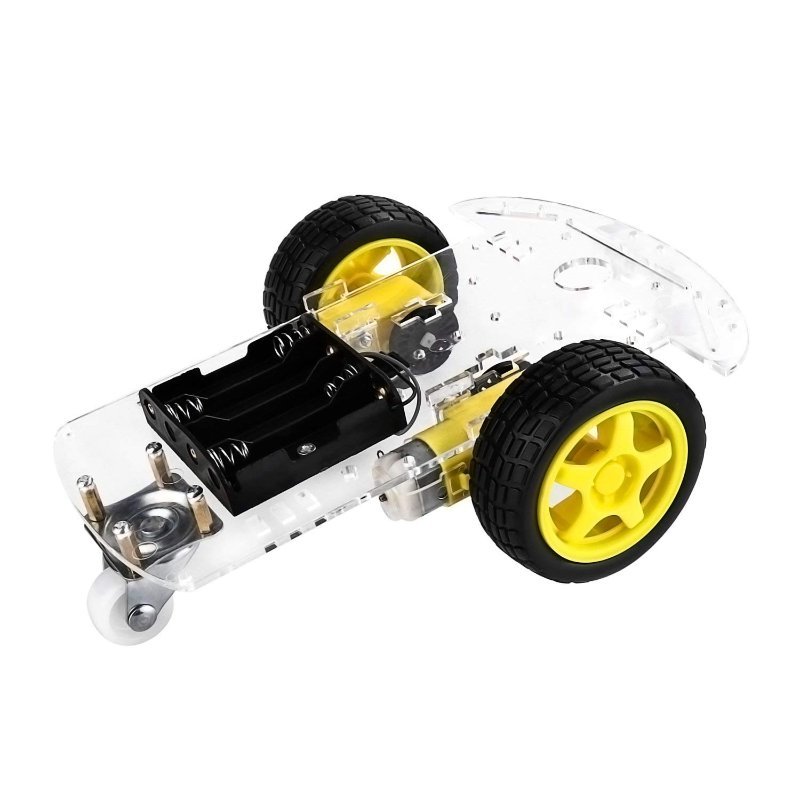
The boring-but-correct base for a first robot: a laser-cut deck riddled with mounting holes, two DC gear motors geared down to a controllable speed, matching wheels, a caster, a speed-encoder disc, and a battery box. It bolts together in an evening and gives your sensors and driver board somewhere to live — no drill required.
Check Price on Amazon →Those two DC gear motors are the reason a kit like this saves so much grief. They arrive already geared at a 48:1 reduction ratio, meaning the motor spins 48 times for one turn of the wheel — slow enough that the robot can actually steer instead of rocketing off the track, with enough torque to pull its own weight. The pre-drilled holes mean mounting the electronics is a matter of screws, not improvisation.
How it all wires together
Two DC motors can’t be driven straight off the Arduino’s pins — those pins can’t source anywhere near enough current, and you need a way to spin each motor in both directions. That job goes to a motor driver, almost always an L298N H-bridge. It takes low-power direction signals from the Arduino and switches the higher-current motor power to match, so a 5V logic pin can command a motor that draws far more than the Arduino could ever supply directly.
The sensor modules run off the Arduino’s 5V rail and feed their digital outputs into three of the digital input pins. As long as everything is a classic 5V Uno-based build, the voltages all agree and you don’t have to think about it. The moment you swap in a 3.3V board like an ESP32, that’s when you start caring about logic levels — but the beginner version keeps everything at 5V and sidesteps the whole issue.
The logic that makes it move
The code is a loop that reads the three sensors and picks one of a few moves. Center sensor on the line? Drive both motors forward. Line under the left sensor? Slow or stop the left motor so the robot pivots left. Line under the right? Mirror it. That’s the entire decision tree, and it fits in a handful of if statements.
The one refinement worth learning early is PWM — pulse-width modulation. Instead of running a motor flat-out or fully off, the Arduino switches it on and off thousands of times a second; the fraction of time it stays “on” sets the effective speed. Slowing one wheel with PWM instead of stopping it dead gives you a gentle turn rather than a lurch, and it’s the difference between a robot that eases around a curve and one that overshoots every bend.
None of this is a weekend you’ll regret. A line follower is small enough to finish, cheap enough not to stress over, and the payoff — watching a thing you built drive itself around a loop for the first time — is exactly the hook that turns a curious beginner into an actual builder.